vuex
🗃️ Centralized State management for non Vue.js applications such as React, ReactJS, React Native
Project maintained by visitsb Hosted on GitHub Pages — Theme by mattgraham
Getting Started
At the center of every Vuex application is the store. A “store” is basically a container that holds your application state. There are two things that make a Vuex store different from a plain global object:
-
Vuex stores are reactive. When reactive components retrieve state from it, they will reactively and efficiently update if the store’s state changes.
-
You cannot directly mutate the store’s state. The only way to change a store’s state is by explicitly committing mutations. This ensures every state change leaves a track-able record, and enables us better understand our applications.
See the complete API, and how you can use Vuex with Typescript in your React applications.
The Simplest Store
NOTE We will be using ES2015 syntax for code examples for the rest of the docs. If you haven’t picked it up, you should!
After installing Vuex, let’s create a store. It is pretty straightforward - just provide an initial state object, and some mutations:
// ./state/counterStore.ts

import {Commit, createStore, Store} from "@visitsb/vuex";

export interface State {
    count: number
}

export const store: Store<State> = createStore({
    state: (): State => ({
        count: 0
    }),
    mutations: {
        INCREMENT(state: State) {
            state.count = state.count + 1
        },
        DECREMENT(state: State) {
            state.count = state.count - 1
        }
    },
    actions: {
        increment({commit}: { commit: Commit }) {
            commit('INCREMENT')
        },
        decrement({commit}: { commit: Commit }) {
            commit('DECREMENT')
        }
    }
});
In order to use the Vuex store with React components, we will use Context provider.
// ./state/counterStore.ts

import {Context, createContext, useContext, useEffect, useState} from "react";

export const StoreContext: Context<Store<State>> = createContext(store);
export const StateContext: Context<State> = createContext(store.state);

export default function useCounterStore() {
    const store = useContext<Store<State>>(StoreContext);
    const state = useContext<State>(StateContext);

    let [watchedState, setWatchedState] = useState(state);

    useEffect((/*didUpdate*/) => {
        const unsubscribe = store.subscribe((_, newState) => setWatchedState((prevState) => ({...prevState, ...newState})));

        return (/*cleanup*/) => {
            unsubscribe();
        }
    }, []);

    // Ensure we can use mapXXX, createNamespacedHelpers
    const _globalThis = (globalThis || self || window || global || {});
    if (typeof _globalThis.$store === 'undefined') {
        _globalThis.$store = store;
    }

    return {store, state: watchedState};
}
Note the Vuex
store.stateis reactive, but not understood by React. So a reactive state using React’s useState is exposed in above setup.
Now, you can pass the store, state to individual components via React’s Context.Provider:
// App.tsx

import {SafeAreaProvider} from 'react-native-safe-area-context';
import CounterExample from "./screens/CounterExample";
import useCounterStore, {StateContext, StoreContext} from "./state/counterStore";

export default function App() {
    const {store, state} = useCounterStore();

    return <SafeAreaProvider>
        <StoreContext.Provider value={store}>
            <StateContext.Provider value={state}>
                <CounterExample/>
            </StateContext.Provider>
        </StoreContext.Provider>
    </SafeAreaProvider>;
}
Inside your React component, you can access the store object as const store = useContext(StoreContext), and trigger a state change with the store.commit method:
// screens/CounterExample.tsx

import {Button, StyleSheet} from 'react-native';
import {Text, View} from '../components/Themed';
import {useContext} from "react";
import {StateContext, StoreContext} from "../state/counterStore";

export default function CounterExample() {
    const store = useContext(StoreContext);

    function increment() {
        store.dispatch('increment');
    }

    function decrement() {
        store.dispatch('decrement');
    }

    return (
        <View style={styles.container}>
            <Text style={styles.title}>Hello Vuex</Text>
            <StateContext.Consumer>{((state) =>
                // Reactively updates below counter as state mutates
                <Text style={styles.text}>Counter value= {state.count}</Text>)
            }
            </StateContext.Consumer>
            <View style={styles.buttons}>
                <Button title="Increment" onPress={increment}/>
                <Button title="Decrement" onPress={decrement}/>
            </View>
        </View>
    );
}

const styles = StyleSheet.create({
    container: {
        flex: 1,
        alignItems: 'center',
        justifyContent: 'center',
    },
    title: {
        fontSize: 20,
        fontWeight: 'bold',
    },
    text: {
        fontSize: 20,
        paddingVertical: 20
    },
    buttons: {
        flexDirection: "row",
        justifyContent: "center"
    }
});
Note the use of Context.Consumer is simply to render just the UI affected by state changes. Of course, you can use
const state = useContext(StateContext)instead which will cause the whole component to re-render. Depending on how your component is designed, you can choose how your UI should update based on state changes.
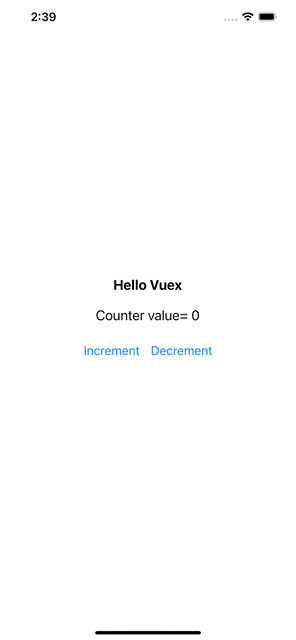
Below is a preview of the Counter example using Vuex in React Native application.
In your components, you can access the store in the same fashion. Now we can commit a mutation using a component method:
const store = useContext(StoreContext);
const state = useContext(StateContext);

function increment() {
    store.commit('INCREMENT');
    console.log(state.count);
}
Again, the reason we are committing a mutation instead of changing state.count directly, is because we want to explicitly track it. This simple convention makes your intention more explicit, so that you can reason about state changes in your app better when reading the code. In addition, this gives us the opportunity to implement tools that can log every mutation, take state snapshots, or even perform time travel debugging.
Using store state in a component simply involves returning the state within a computed property, because the store state is reactive. Triggering changes simply means committing mutations in component methods.
Next, we will discuss each core concept in much finer details, starting with State.